 |
You’re reading Ry’s Git Tutorial |
Rewriting History
The previous module on rebasing taught us how to move commits around and perform some basic edits while doing so, but now we’re going to really get our hands dirty. We’ll learn how to split up commits, revive lost snapshots, and completely rewrite a repository’s history to our exact specifications.
Hopefully, this module will get you much more comfortable with the core Git components, as we’ll be inspecting and editing the internal makeup of our project.

If you’ve been following along from the previous module, you already have everything you need. Otherwise, download the zipped Git repository from the above link, uncompress it, and you’re good to go.
Create the Red Page
First, let’s create a new branch and add a few more HTML pages.
gitcheckout-bnew-pagesgitbranch
Notice that we created a new branch and checked it out in a single step by
passing the -b flag to the git checkout command.
Next, create the file red.html and add the following content:
<!DOCTYPE html><htmllang="en"><head><title>The Red Page</title><linkrel="stylesheet"href="style.css"/><metacharset="utf-8"/></head><body><h1style="color: #C00">The Red Page</h1><p>Red is the color of<spanstyle="color: #C00">passion</span>!</p><p><ahref="index.html">Return to home page</a></p></body></html>
We’ll hold off on committing this page for the moment.
Create the Yellow Page
Create a file called yellow.html, which should look like the
following.
<!DOCTYPE html><htmllang="en"><head><title>The Yellow Page</title><linkrel="stylesheet"href="style.css"/><metacharset="utf-8"/></head><body><h1style="color: #FF0">The Yellow Page</h1><p>Yellow is the color of<spanstyle="color: #FF0">the sun</span>!</p><p><ahref="index.html">Return to home page</a></p></body></html>
Link and Commit the New Pages
Next, we’ll link both new pages to the home page. Add the following
items to the “Navigation” section in index.html:
<listyle="color: #C00"><ahref="red.html">The Red Page</a></li><listyle="color: #FF0"><ahref="yellow.html">The Yellow Page</a></li>
Then, commit all of these changes in a single snapshot.
gitaddred.htmlyellow.htmlindex.htmlgitstatusgitcommit-m"Add new HTML pages"
This is an example of a bad commit. It performed multiple, unrelated tasks, and it has a relatively generic commit message. Thus far, we haven’t really specified when it’s appropriate to commit changes, but the general rules are essentially the same as for branch creation:
- Commit a snapshot for each significant addition to your project.
- Don’t commit a snapshot if you can’t come up with a single, specific message for it.
This will ensure that your project has a meaningful commit history, which gives you the ability to see exactly when and where a feature was added or a piece of functionality was broken. However, in practice, you’ll often wind up committing several changes in a single snapshot, since you won’t always know what constitutes a “well-defined” addition as you’re developing a project. Fortunately, Git lets us go back and fix up these problem commits after the fact.
Create and Commit the Green Page
Let’s create one more page before splitting that “bad”
commit: Add the following HTML to a file called green.html.
<!DOCTYPE html><htmllang="en"><head><title>The Green Page</title><linkrel="stylesheet"href="style.css"/><metacharset="utf-8"/></head><body><h1style="color: #0C0">The Green Page</h1><p><spanstyle="color: #0C0">Green</span>is the color of earth.</p><p><ahref="index.html">Return to home page</a></p></body></html>
Add a link to index.html in the “Navigation” section:
<listyle="color: #0C0"><ahref="green.html">The Green Page</a></li>
And finally, stage the green page and commit the snapshot.
gitaddgreen.htmlindex.htmlgitstatusgitcommit-m"Add green page"
Begin an Interactive Rebase
The commits introduced in our new-pages branch are:
4c3027cAdd green pagedb96c72Add new HTML pages
But, we want these commits to look more like:
4c3027cAdd green page9b1a64fAdd yellow page77a1cf1Add red page
To achieve this, we can use the same interactive rebasing method covered in the previous module, only this time we’ll actually create commits in the middle of the rebasing procedure.
gitrebase-imaster
Change the rebase listing to the following, then save the file and exit the editor to begin the rebase.
editdb96c72Add new HTML pagespick4c3027cAdd green page
Undo the Generic Commit
First, let’s take a look at where we are with git log
--oneline:
db96c72Add new HTML pages7070b0eAdd link to about section in home page ...
When Git encountered the edit command in the rebase
configuration, it stopped to let us edit the commit. As a result, the green
page commit doesn’t appear in our history yet. This should be familiar
from the previous module. But instead of amending the current commit,
we’re going to completely remove it:
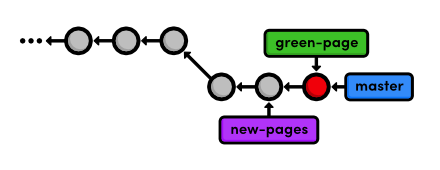
gitreset--mixedHEAD~1gitlog--onelinegitstatus
The git reset command moves the checked out snapshot to a new
commit, and the HEAD~1 parameter tells it to reset to the commit
that occurs immediately before the current HEAD (likewise,
HEAD~2 would refer to second commit before HEAD). In
this particular case, HEAD~1 happens to coincide with
master. The effect on our repository can be visualized as:
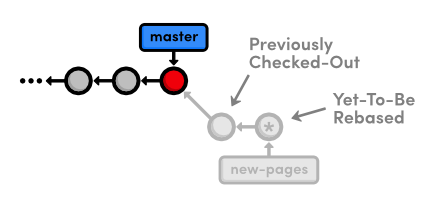
HEAD~1You may recall from Undoing Changes that
we used git reset --hard to undo uncommitted changes to our
project. The --hard flag told Git to make the working directory
look exactly like the most recent commit, giving us the intended effect of
removing uncommitted changes.
But, this time we used the --mixed flag to preserve the working
directory, which contains the changes we want to separate. That is to say, the
HEAD moved, but the working directory remained unchanged. Of
course, this results in a repository with uncommitted modifications. We now
have the opportunity to add the red.html and
yellow.html files to distinct commits.
Split the Generic Commit
Let’s start with the red page. Since we only want to commit content
that involves the red page, we’ll have to manually go in and remove the
yellow page’s link from the “Navigation” section. In
index.html, change this section to match the following:
<h2>Navigation</h2><ul><li><ahref="about/index.html">About Us</a></li><listyle="color: #F90"><ahref="orange.html">The Orange Page</a></li><listyle="color: #00F"><ahref="blue.html">The Blue Page</a></li><li><ahref="rainbow.html">The Rainbow Page</a></li><listyle="color: #C00"><ahref="red.html">The Red Page</a></li></ul>
Now, we can group the red page’s updates into an independent commit.
gitaddred.htmlindex.htmlgitstatusgitcommit-m"Add red page"
Next up is the yellow page. Go ahead and add it back to the
“Navigation” section in index.html:
<listyle="color: #FF0"><ahref="yellow.html">The Yellow Page</a></li>
And again, stage and commit the snapshot.
gitaddyellow.htmlindex.htmlgitstatusgitcommit-m"Add yellow page"
We’ve successfully split up the contents of a single commit into two new snapshots, as shown below.
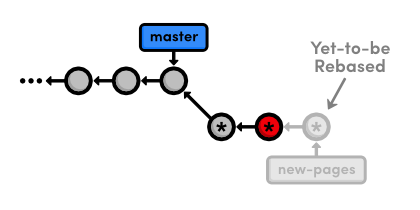
But, don’t forget that the rebase still needs to transfer the green page:
gitrebase--continue
To summarize, we removed the “bad” commit from the current
branch with git reset, keeping the contained HTML files intact
with the ‑‑mixed flag. Then, we committed them in
separate snapshots with the usual git add and git
commit commands. The point to remember is that during a rebase you can
add, delete, and edit commits to your heart’s content, and the entire
result will be moved to the new base.
Remove the Last Commit
Next, we’re going to “accidentally” remove the green page commit so we can learn how to retrieve it via Git’s internal repository data.
gitreset--hardHEAD~1gitstatusgitlog--oneline
This moves the checked-out commit backward by one snapshot, along with the
new-pages pointer. Note that git status tells us that
we have nothing to commit, since the --hard flag obliterated any
changes in the working directory. And of course, the git log
output shows that the new-pages branch no longer contains the
green commit.
This behavior is slightly different from the reset we used in the
interactive rebase: this time the branch moved with the new
HEAD. Since we were on (no branch) during the rebase,
there was no branch tip to move. However, in general, git reset is
used to move branch tips around and optionally alter the working directory via
one of its many flags (e.g., --mixed or --hard).

The commit that we removed from the branch is now a dangling commit. Dangling commits are those that cannot be reached from any branch and are thus in danger of being lost forever.
Open the Reflog
Git uses something called the reflog to record every change you make to your repository. Let’s take a look at what it contains:
gitreflog
The resulting output should look something like the following. Depending on
your version of Git, the messages might be slightly different. You can press
Space to scroll through the content or q to exit.
9b1a64fHEAD@{0}:reset: moving to HEAD~1002185cHEAD@{1}:rebase -i (finish): returning to refs/heads/new-pages002185cHEAD@{2}:rebase -i (pick): Add green page9b1a64fHEAD@{3}:commit: Add yellow page77a1cf1HEAD@{4}:commit: Add red page7070b0eHEAD@{5}:reset: moving to HEAD~1 ...
The above listing reflects our last few actions. For example, the current
HEAD, denoted by HEAD@{0}, resulted from reseting
HEAD to HEAD~1. Four actions ago, the yellow page was
applied during our rebase, as shown in HEAD@{3}.
The reflog is a chronological listing of our history, without regard for the repository’s branch structure. This lets us find dangling commits that would otherwise be lost from the project history.
Revive the Lost Commit
At the beginning of each reflog entry, you’ll find a commit ID
representing the HEAD after that action. Check out the commit at
HEAD@{2}, which should be where the rebase added the green page
(change the ID below to the ID from your reflog).
gitcheckout002185c
This puts us in a detached HEAD state, which means our
HEAD is no longer on the tip of a branch. We’re actually in
the opposite situation as we were in Undoing
Changes when we checked out a commit before the branch tip. Now,
we’re looking at a commit after the tip of the branch, but we
still have a detached HEAD:
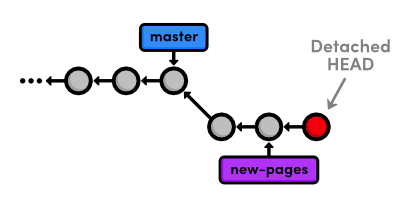
To turn our dangling commit into a full-fledged branch, all we have to do is create one:
gitcheckout-bgreen-page
We now have a branch that can be merged back into the project:
The above diagram makes it easy to see that the green-page
branch is an extension of new-pages, but how would we figure this
out if we weren’t drawing out the state of our repository every step of
the way?
Filter the Log History
To view the differences between branches, we can use Git’s log-filtering syntax.
gitlognew-pages..green-page
This will display all commits contained in green-page that
aren’t in the new-pages branch. The above command tells us
that green-page contains one more snapshot than
new-pages: our dangling commit (although, it’s not really
dangling anymore since we created a branch for it).
You can also use this syntax to limit the output of git log.
For example, to display the last 4 commits on the current branch, you could
use:
gitlogHEAD~4..HEAD
However, this is a bit verbose for such a common task, so Git developers
added the -n flag as an easier way to limit output.
gitlog-n4
The -n 4 parameter tells Git to show only the last four commits
from the current HEAD, making it the equivalent of the
HEAD~4..HEAD syntax shown above. Similarly, -n 3,
-n 2, and -n 1 would display three, two, and one
commit, respectively. This feature becomes very useful once a repository grows
beyond one screenful of history.
Merge in the Revived Branch
We’ve revived our lost commit, and now we’re ready to merge
everything back into the master branch. Before we do the merge,
let’s see exactly what we’re merging:
gitcheckoutmastergitlogHEAD..green-page--stat
The git log HEAD..green-page command shows us only those
commits in green-page that aren’t in master
(since master is the current branch, we can refer to it as
HEAD). The new --stat flag includes information about
which files have been changed in each commit. For example, the most recent
commit tells us that 14 lines were added to the green.html file
and 3 lines were added to index.html:
commit002185c71e6674915eb75be2afb4ca52c2c7fd1bAuthor:Ryan <ryan.example@rypress.com>Date:Wed Jan 11 06:49:50 2012 -0600Add green page green.html | 14 ++++++++++++++ index.html | 3 +++ 2 files changed, 17 insertions(+), 0 deletions(-)
If we didn’t already know what was in this new commit, the log output would tell us which files we needed to look at. But, we authored all of these changes, so we can skip right to the merge.
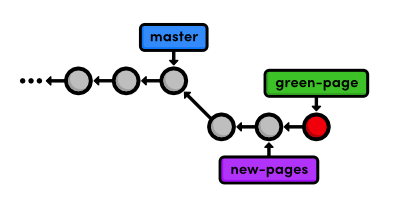
gitmergegreen-page
The following diagram shows the state of our repository after the merge.
master to the
green-page branchNote that the green-page branch already contains all the
history of new-pages, which is why we merged the former instead of
the latter. If this wasn’t the case, Git would complain when we try to
run the following command.
gitbranch-dnew-pages
We can go ahead and delete the green page branch, too.
gitbranch-dgreen-page
Conclusion
This module took an in-depth look at rebasing, resetting, and the reflog. We learned how to split old commits into one or more new commits, and how to revive “lost” commits. Hopefully, this has given you a better understanding of the interaction between the working directory, the stage, branches, and committed snapshots. We also explored some new options for displaying our commit history, which will become an important skill as our project grows.
We did a lot of work with branch tips this module. It’s important to realize that Git uses the tip of a branch to represent the entire branch. That is to say, a branch is actually a pointer to a single commit—not a container for a series of commits. This idea has been implicitly reflected in our diagrams:
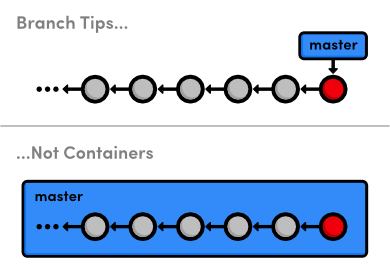
The history is represented by the parent of each commit (designated by arrows), not the branch itself. So, to request a new branch, all Git has to do is create a reference to the current commit. And, to add a snapshot to a branch, it just has to move the branch reference to the new commit. An understanding of Git’s branch representation should make it easier to wrap your head around merging, rebasing, and other kinds of branch manipulation.
We’ll revisit Git’s internal representation of a repository in the final module of this tutorial. But now, we’re finally ready to discuss multi-user development, which happens to rely entirely on Git branches.
Quick Reference
git reflog- Display the local, chronological history of a repository.
git reset --mixed HEAD~<n>- Move the
HEADbackward<n>commits, but don’t change the working directory. git reset --hard HEAD~<n>- Move the
HEADbackward<n>commits, and change the working directory to match. git log <since>..<until>- Display the commits reachable from
<until>but not from<since>. These parameters can be either commit ID’s or branch names. git log --stat- Include extra information about altered files in the log output.